Introduction
Running A/B tests are pretty straightforward. Pick an A/B testing platform, set up some JavaScript snippets, and start making your changes through the provided editor.
It works great for testing copy and small HTML/CSS changes, but what if your tests are more complex?
Netlify looks to solve this problem by allowing you to A/B test multiple GitHub branches.
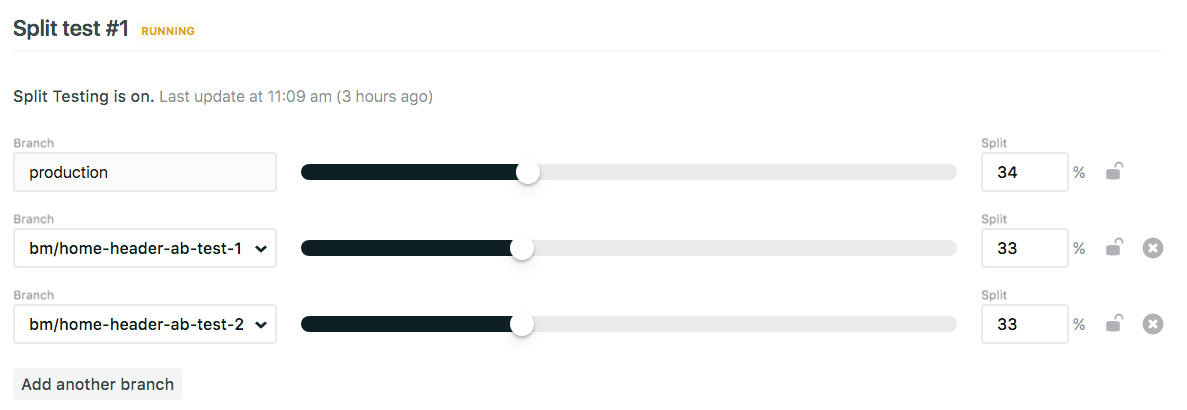
You just select the available branch, specify how you want to split the traffic, and you’re ready.
Well, you’re not quite ready. The documentation provided was sparse, but with some testing, I was able to get Netlify to play nicely with our Google Analytics code in Tag Manager.
I’ll explain the steps I took to get it working smoothly.
Displaying Branch Names
For our single page react site, one of our engineers created a script under each of our testing branches to dynamically pull in the branch name.
<script
\ dangerouslySetInnerHTML={{
\ __html: \`window.ab_branch = "${process.env.BRANCH}";\`,
\ }}
\ />
We could have statically set this data, but figured this would allow us to scale our testing without having to modify the script manually.
Now that we’re capturing the branch name, we need to create a new custom dimension in Google Analytics.
Creating a Custom Dimension
Since this is our first custom dimension, it’s given an index of “1”.
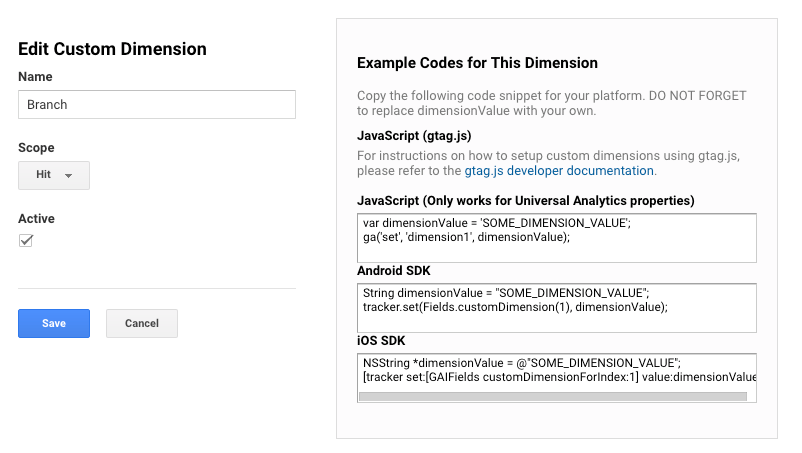
We’ve given our custom dimension a creative name, “Branch” along with a scope of “Hit”. Mark it active and you’re done here. We tested this using the provided JavaScript snippet but ran into issues with it not pulling the proper branch name — instead, I’d see branches called “undefined”.
I went ahead and used the Google Analytics Debug chrome extension and reloaded the page.
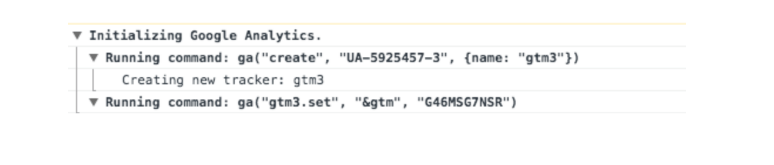
Here I could see we needed to make some changes to our snippet to include the gtm3 tracker.
Updating Google Analytics Snippet
Taking the information from above, we made some modifications to the snippet template provided by GA.
Original
var dimensionValue = ‘window.ab_branch’;
ga(‘set’, ‘dimension1’, window.ab_branch);
New
var dimensionValue = ‘window.ab_branch’;
ga.gtm3(‘set’, ‘dimension1’, window.ab_branch);
Once we insert that in the head below our existing GA tag, we can rerun Google’s Debugger to verify we see the correct branch name.
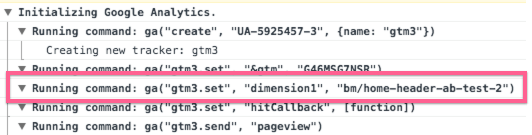
It looks like it’s working. Now hop on over to Google Analytics see if it’s working correctly.
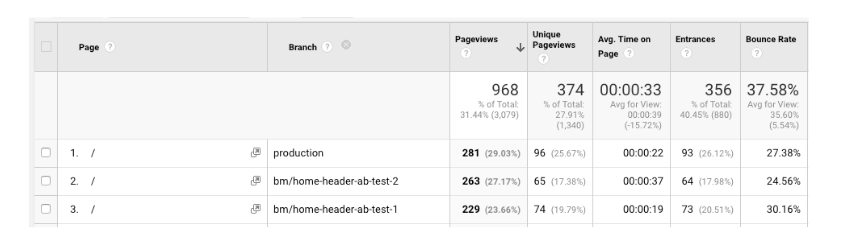
I like to go to the Behavior --> All Pages screen since we’re A/B testing our homepage, and click into the homepage.
Specifying “Branch” under the Secondary Dimension dropdown, we see our three branches and corresponding metrics to test with our experiment.
If you’re using Google Tag Manager, the process is even easier.
Google Tag Manager
If you’re running your GA script through GTM, you don’t need to add any additional custom dimension snippets to your codebase. You’re going to head over to your GA tag in Tag Manager and set your custom dimension there.
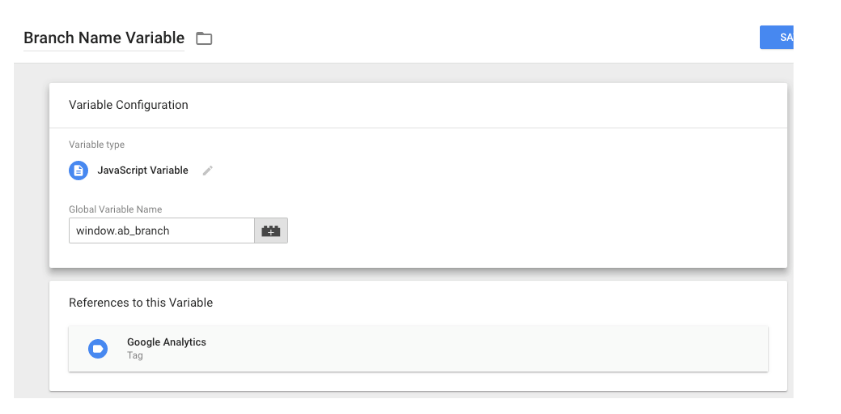
Once you’re in Google Tag Manager, you have two things to do.
First, create a new User-Defined-Variable (I’m calling ours “Branch Name Variable”), and we’re going to set it with a Global Variable Name of: `window.ab_branch`
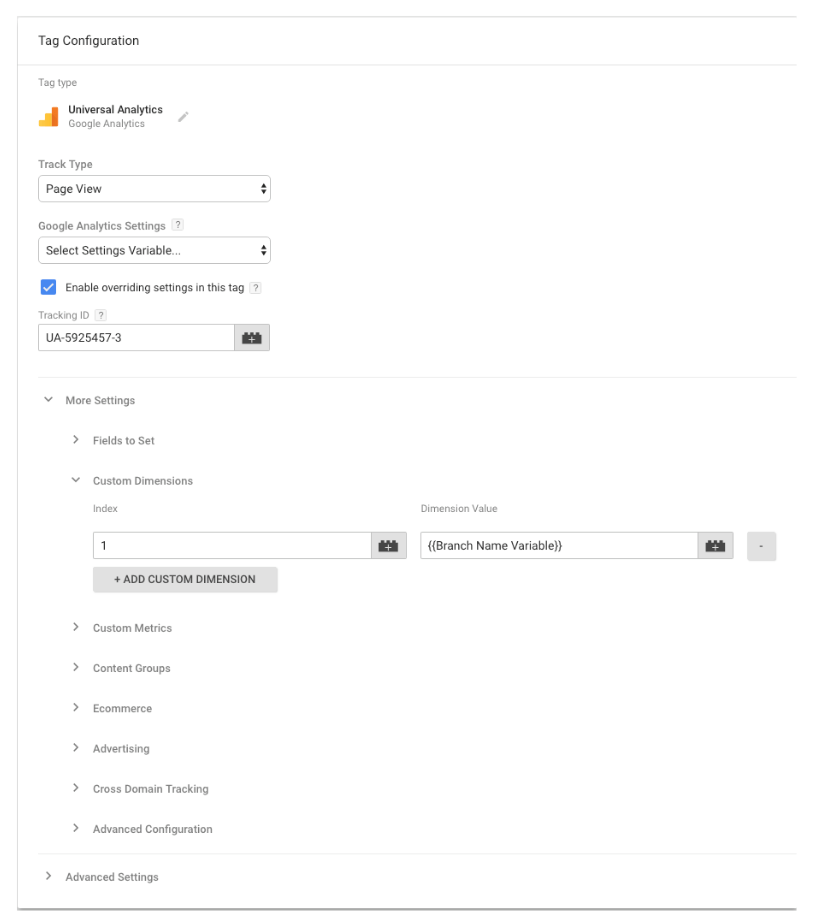
From here, we’ll head over to our GA tag, select “Enable overriding settings in this tag”, and create a Custom Dimension with the Index of 1 (or whatever index your custom dimension was assigned), and we’ll assign it with {{Branch Name Variable}} as the value.
Once this looks good and you’ve published it, you’ll head back over to Google Analytics as we did before.
Take a look at your homepage view under Behavior --> All Pages, and specify “Branch” as your custom dimension.
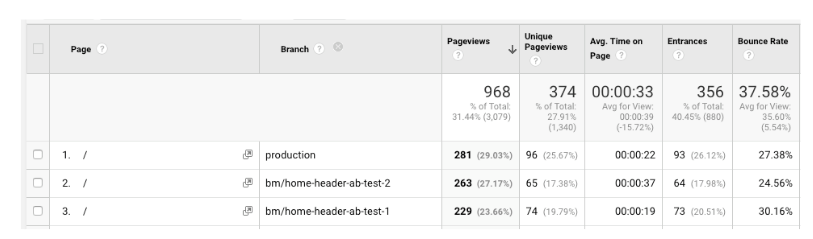
Of course, you’ll need to run some traffic to the site to start populating metrics for each variation, and you should start to see them coming through to each corresponding branch.
That’s it. You’re done!
Wrapping Up
A/B testing with out of the box solutions are always a good solution to make minor front-end changes, but if you’re looking for more flexibility to test directly from your git branches, Netlify provides a great way to get set up and measure results directly within Analytics. Since GA is our primary analytics tool, it’s nice not to have to rely on an additional platform to measure separate testing metrics.